During my internship at playlogic I developed 2 photoshop javascripts that greatly speed up the texture saving process (.PSD to .TGA) You can download them at the bottom of the page
Why use the scripts?
- – No more spelling mistakes in your naming conventions
- – Super fast exporting to .TGA
- – Even faster exporting using parameters
- – Option to resize images on exporting.
- – All you textures in 1 .psd
The scripts:
Texture Creator
The first script (Texture creator) will create a psd that is fully compatible with the exporting script. Altough using the first script isnt required the run the second one. It is way easier to use this untill you are more familiar with the exporting script. With that said, lets continue.
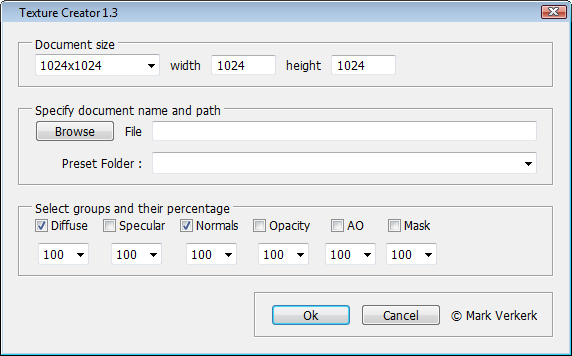
When you run the script you will notice that it will bring up a dialogue. In this dialogue there are a few options that are important:
- . First you must specify the size of your document
- . Then use the Browse to specify a file and path
(Please note that the name of the psd will be used to construct the name of the exported .tga’s)
(For example; MyTexture.psd will become MyTexture_”Suffix”.tga)
- .Then select the checkboxes of the groups you are going to use, along with at what percentage they will be used ingame.
(I for instance always make my psd at least twice as large, then save it at 50 percent)
- .When you are done press Ok
Now the magic happens, the script will create a new psd for you, saves it with the specified name at the specified path. Then it will create the groups you specified with parameters.
Texture Exporter:
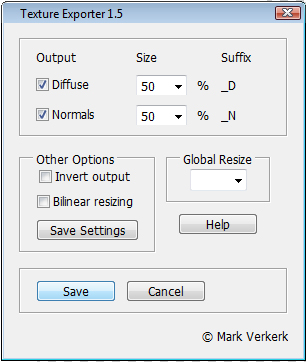
This is where the second script comes in to play, when you run the exporter script you will see the following dialogue:

As you can see the script has found all the groups at the highest level of your psd hierarchy, extracted their parameters and showcased their names.
(Note that output groups will be checked or not checked depending on the visibility flag of that group in your psd)
- .For explaining purposes you should change the percentage of one of your output groups and then press save settings
(This will update the parameters of all your groups in the document)
- .Now you should check all the output group checkboxes and press save.
As you can see the script now starts hiding and unhiding layers, resizing, undoing the resizing and reverting your psd back to normal.
(Please note that only groups in the highest level of your hierarchy will be used for exporting, so if you have any ungrouped layers, they will be ignored)
(Also note that the script saves the state of wich your psd is in before it changes anything. After the script has finished it will set the psd back to as it was)
If you used the default groups you will have 2 different files in the same directory as your original psd. One being called (psdname_D.tga and psdname_N.tga)
More information:
- -‘Diffuse’, ‘Specular’, ‘Normals’, ‘Opacity’, ‘AO’ and ‘Mask’ are the names of the recognized groups. For unrecognized group names the script will simply take the first letter of the group name. You can override this by manually adding the “-n” parameter at the end of the group name. Now the script will take the entire group name (without parameters) as suffix.
- -When an alpha channel is present you will be granted an extra checkbox on running the exporter script. When checking this checkbox the corresponding group will be saved as a
- 32 bits targa with your alpha channel (If you psd has more then one alpha channel, the script wont like it!) (The parameter for always checking this group is -a)
- -When saving a tileable texture combined with resizing you should check the “bilinear resizing” checkbox for better results.
- -TIP! Put a layer containing a wireframe on top of the document, this way you know where you are painting on your texture and it wont be saved (as long as it isnt in a group) with your final .tga’s
Disclaimer:
By using the script you agree on that any form of data loss, damage or what so ever is your own responsibility and that I cant be held responsible for it.
Download:
_______________________________________________________________________________________
Installing the script
To install the script in the form of handy buttons you must use photoshop actions.
If you are not familiar with these actions follow these steps:
– First Set the scripts somewhere on your hard drive (the path must never change or you will have to do this all over)
– Then start up photoshop and go to Window-> Actions. If you have never opened this window before it is propably full of presets that you will never use, you can remove them by selecting the folders and press the trashbin.
– Now make a new group in your actions palette and call it something like, texture exporter.
– creata a small empty canvas and then go to your actions palette and press the new action button
– enter the name Photoshop exporter, define a function key (shortcut) and if you want a color.
– when you press record you will notice that the red button on the bottom is turned on, that is ok.
– At this point everything you do is being recorded, so go to file-> scripts-> browse and find the scripts that you placed on your harddrive, then select the PhotoshopTextureCreator.jsx and press open. You will now see the dialogue but you shoudnt do anything, just press cancel.
– Next you must stop recording by pressing the stop button, if the red button returned to grey it is done.
Repeat these steps for the PhotoshopTextureExporter.jsx file and your set.
Now to use these as buttons you can go to the upper right corner arrow of your actions palette and select button mode.
You have now succesfully integrated the scripts into photoshop

